Down and Up
Instructions for downloading and uploading your site
Downloading your site from our server to your computer:
Technically and contractually - once we deliver your completed site design to you our obligation to you is complete [more about our standard delivery and obligations]. We offer to FTP your files to your hosting server at no additional charge - provided you give us access to that server (ftp address, user name & password) and provided we do not encounter any out of the ordinary obstacles (Does not apply to site work performed by others).
It is not necessary to have a back-up of your website - but it is recommended. You should save a backup of your website onto your computer (as well as additional backups at separate safe locations). We do not send copies of your website to you on a CD. We will keep the latest copy of your site (or the portion we worked on) available to you in our archive.
We emphasize the importance of our clients "doing for themselves" such things as:
- downloading and backing up their own sites
- FTPing their sites from their computers
- registering and maintaining active registration of their domain names (with periodic renewal spanning several years at a time)
- retaining their hosting service (usually an annual payment to host, via auto payment)
We will send you "one" zipped folder of your completed site; additional copy for each site update. We offer the following alternate methods to you for downloading and saving a copy of your website to your hard drive. We do not offer any customer support in this area - other than the following tutorial.
There are two methods of downloading your site from our server to your computer. The first (though it may or may not be the best) is perhaps more expedient. You simply open your web pages on our server and choose (one page at a time) "file" from your browser tool bar above. Then select "save as" or "save page as" (depending on your system) and save to a folder you created for that purpose. Repeat for each page.
The second method is more involved, but it is the method we recommend. This process puts you more in touch with your website and more in control when it comes to uploading it to your sever - so the world can see it. Here is the process we recommend. Once you work with it for a little while you may find it is not as complicated as it first appears.
Downloading your website to your computer:
- Create a master "website" folder on your computer.
- Within your master "website" folder, create a folder named with your site domain name (for example: "applejacks.com" - all lower case, no spaces)
- Go online and open the home page of your website (as it resides on our server).
- Right click in an open area of that page and choose "view source" or "view page source" (varies with different systems).
- In the tool bar of the window that opens - choose "file" - "save as" or "save page as" (varies with different systems).
- A "save as" window will open. You have three fields to work with before you click "save".
- Normally, at the top of that window you will see a "save in" field. Save in the last folder you created (example: applejacks.com).
- "File Name" should already be filled in correctly; in this case it is "index" (do not change the file names arbitrarily - needs to be the name shown at the end of your address bar - all lower case, no spaces or added characters).
- Depending on your system - the third and final field to be concerned with is the "save as type" field. This is where things can get a little bit annoying. But, what you want to end up with is a file in your "applejacks" - domain folder named "index.htm" or "index" followed by an icon representing your internet browser.
- If you run into problems with file type - just save as whatever file type it assigns and then go back into your "applejacks" folder and, if your system seems to have assigned the wrong file type, rename all your pages so that they end with ".htm".
- If you see a field titled "encoding" - you should be safe to ignore it (ANSI should work as a default).
- Now, simply repeat the process from above
for each of your web pages - for example:
- Open up your "about" page; right click and choose view source
- Click on "file" and "save as"
- Confirm location you are saving file to (normally same as before)
- Confirm that file name matches name at end of url in address bar - in this case "about"
- Save as ".htm" file type; example: "about.htm"
- Have you saved all your website pages to
your domain folder? Open the folder you named
"website" and then open the folder you named
with your domain name (for example:
"mydomainname.com"). Confirm that each of
your pages are saved there with the file
extension ".htm". Sometimes you will end up
with what seems like a double extension, ex:
"about.htm.htm". Of course you want to
avoid/correct that. Chances are your system
will indicate the file type by showing it
with an internet icon (as with the blue "e"
in the image below) - telling us it is an
".htm" file type:
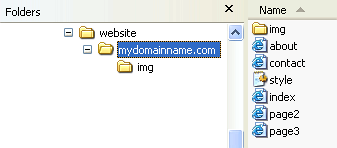
Depending on how "view" is setup, you may not see the file extensions, but the icons will show you what "file type" has been assigned (instead of the names ending in .htm). -
Download Your
Graphics - Okay, if you made it
this far the next part may not be too
tough to deal with; your graphics. If
your site has any graphics (background
image(s), logos, photos, etc) you will
need to do the following:
- Within your domain folder (remember? "applejacks.com", "yourdomain.com", etc) create a new folder named "img" (lower case).
- Now work your way thru all of your web pages and look for any graphics (background image(s), logos, photos, etc).
- Each time you come across a graphic/image etc, right click and choose "save picture as", "save image as", etc (depends on your browser, etc).
- Save each graphic/image on your site to your "img" folder. Do not change the img name or file type (or size or dimensions). If the same image appears on more than one page - you only have to save it once.
-
Your Style Sheet
- Now you have a functioning
website on your computer, but it has no
"style". To see what we mean, double
click on "index.htm". That file should
open in a browser window, but you will
see the content in black and white with a
sort of generic organization. That's
because it can't find it's style sheet.
- Go back online to your homepage (make sure you go online and not to the file on your computer).
- In the address bar of your browser replace "index.htm" with "style.css" and hit enter.
- That should open your site's Cascading Style Sheet - usually in "notepad" for window's users (this process will also work if file opens in your browser).
- If you are not familiar with CSS, this page may not make any sense, but your website will make sense of it.
- At the top of this document click on "file" and "save as"
- Be sure not to save in your "img" folder - as that may appear as the default. Instead, you want to save this file in your "domainname.com" folder along with your other htm files.
- "File Name" - may be a little tricky. You want to end up with "style.css" as your file name (and file type - as in cascading style sheet.). You probably have a drop-down field for "file type" but, it may not give you the option to save as ".css" or style or style sheet, etc. Once again, if all else fails, you may need to go back afterwards and change the name to "style.css" (all lower case).
- Your files will look something like
this:
- Put it to a Test - Did you successfully download a working live copy of your website to your computer? Well, that is easy enough to find out before you upload it to your server.
- To see if you were successful, simply double click on the "index.htm" file in your domain name folder (inside your "website" folder). Now take your site (housed on your computer) for a spin.
- Are you missing a page or image? Don't be too discouraged - especially if you are new to this. Please go back - retracing our steps - to see where you went off course.
- Although, officially, we do not offer customer support in this area (beyond this tutorial) - if you are having difficulty and if you are willing to e-mail us the detailed steps you are taking, in your words (don't copy-and-past our instructions) we will attempt to see where you may have gone off the path. And possibly update our tutorial in the process.
Uploading your site from your computer to your hosts server:
We offer to FTP your files to your hosting server at no additional charge - provided you give us access to that server (ftp address, user name & password) and provided we do not encounter any out of the ordinary obstacles.
Still, we encourage you to learn how to FTP and the following tutorial is provided as a rough guide to the FTP process. This is the extent of our customer support in this area. If you want more information about how to load your site files to your host's server you should go to that host's site and visit their Help/FAQs, tutorials and forums for instructions specific to their system.
- In terms of groundwork you should now
have three matters taken care of:
- A web host (They will provide you with: FTP address, user name, password and DNS)
- A registered domain name with DNS numbers provided to your registrar, by you, pointing to your web host's server.
- Your website files downloaded to your computer; ready to be uploaded
- Once you have the three items established above you can FTP your website files to your host's server.
- Each web host may have a slightly different file directory system, so you will want to check your host's help files for instructions on uploading your site.
- If you do not have an FTP application, we recommend FileZilla (for Windows). It is free, fast and stable. There are numerous other FTP programs available - some are free or have trial versions.
- The following is provided as a rough
guide. Again, you should review your hosts
Help/FAQs for instructions to avoid causing
problems with your site's directory:
- Open your FTP client and log onto your server with the FTP address, user name and p/w provided by your web host.
- You should now be able to observe the file directory system on your hosts server.
- You will be looking for the directory (folder) that your web host has provided to you for your pages. For example: they may have a directory/folder named "public html" which they have designated as the location for you to place all your website files.
- Within your FTP program you should open (in a separate panel) the folder containing your website files (.htm, .css and "img" folder, if you have images on your site.)
- Upload all of these (.htm, .css and "img" folder) to the appropriate folder on the host's server (ex: "public html")
- There are a number of ways to perform this process, but the simplest may be to drag and drop each item separately (.htm, .css and "img" folder) from the panel showing your computer files to the panel showing the host's server - into the appropriate server directory.
- Depending on a number of factors, you may want to wait until each file is uploaded successfully before attempting to upload the next one. With a little luck, you may be able to drag the "img" folder and successfully upload all of it's contents without having to move one image file at a time.
- Once you have completed your upload, you might take a moment to confirm that you can see all files present on the host's server. Sometimes a file "corrupts" during the upload; comparing file sizes may help to indicate that they uploaded successfully. If you find that any files failed to upload successfully you can re-submit them and over-write the bad file.
- Okay, now it's time to see how we did. Log out of, and, or close the connection to your server and then close the FTP application.
- Next, open a browser and enter your website address - for example: www.nutsandbolts.com, www.marbles.org, etc; hit enter and cross your fingers.
-
Troubleshooting?
- Remember this is just a rough
guide and you really should refer to your
web host for FTP assistance. But here are
a few thoughts:
- Check the entire address field for errors.
- Empty the cache on your browser, close it, open it and try again.
- Normally it only takes a minute at most after FTPing before being able to view your site online, but this may vary with your host. So, you may want to come back in maybe 15 minutes (repeating above step) and try again.
- Check your internet connection.
- Open the FTP application again, log on to your server with it, and review the files (compare the files on your server to the files on your hard drive). Are they in the correct directory? Compare file sizes for an indication that upload may have been corrupted (delete bad file on server and upload that file again).
- Log into your account with your registrar and confirm that you provided the correct primary and secondary DNS. In some cases, depending on your registrar, it may take several days before they process your DNS so that it points to your site on your host's server.
- Go back to your host site and visit their Help/FAQs, tutorials and forums.
- Knowledge is Power - Though it may be challenging at first, acquiring the ability to FTP content to your website increases your independence. Good Luck!
webpage design © WildIrisDigital.com